Microsoft Teams is a powerful collaboration platform that allows individuals and organizations to communicate, share files, and work together seamlessly. Creating a team in Microsoft Teams is the first step toward efficient teamwork and productivity. In this blog post, we’ll guide you through the process of how to create a team in Microsoft Teams.
Step 1: Sign in to Microsoft Teams
Before you can create a team, you need to sign in to Microsoft Teams using your Microsoft 365 or Microsoft Teams account. If you don’t have an account, you can sign up for one.
Step 2: Access the Teams App
Once you’re signed in, open the Microsoft Teams app on your computer or mobile device. If you don’t have the app installed, you can access Teams through your web browser.
Step 3: Create a New Team
To create a new team, follow these steps:
- Click on the “Teams” icon in the left sidebar to access your Teams dashboard.
- At the bottom of your Teams dashboard, click on the “+ Join or create a team” button.
- You’ll have two options: “Join a team with a code” or “Create a team.” Click “Create a team” to proceed.
Step 4: Choose a Team Type
Microsoft Teams offers two types of teams: private and public.
-
Private Team:
This type of team is invite-only, and members need approval to join.
-
Public Team:
Anyone within your organization can join a public team without needing approval.
Select the appropriate type for your team, keeping in mind the sensitivity of the information and the purpose of the team.
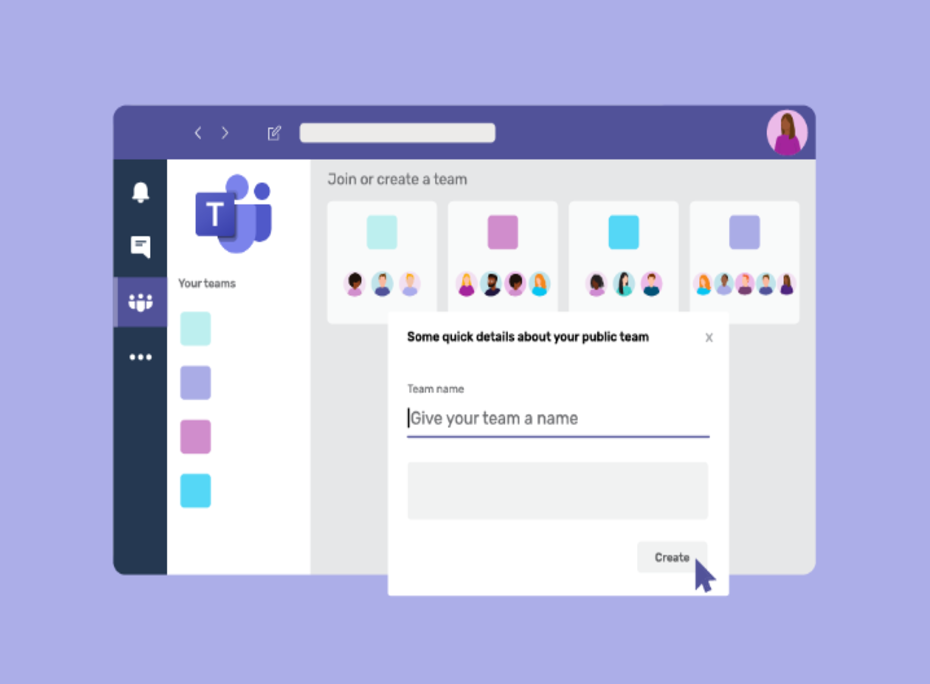
Step 5: Set Up Your Team
Now it’s time to configure your team:
- Team Name:
Enter a name for your team that clearly reflects its purpose.
- Description:
Provide a brief description to help team members understand the team’s goals and objectives.
- Privacy:
Select your team’s privacy settings based on the type you chose earlier (private or public).
- Data Classification:
If applicable, choose a data classification for the team. This helps in managing data access and security.
- Additional Settings:
Customize other settings, such as member permissions and whether members can edit or delete channels.
Step 6: Add Members
After configuring your team settings, you can start adding members. You can either type their names or email addresses in the “Add members” field or search for them in your organization’s directory. Click “Add” next to each member’s name to invite them to the team.
Do you and your friends want to have fun together on Snapchat? Click here for a guide on group chats.
Step 7: Create Channels
Channels are sub-sections within your team where you can organize discussions and files around specific topics or projects. To create a channel, follow these steps:
- Click on your team name in the left sidebar to access the team’s main page.
- Click on the “More options” (…) button next to your team’s name.
- Select “Add channel.”
- Name the channel and provide a description if needed.
Step 8: Start Collaborating
Now that your team and channels are set up, you can start collaborating with your team members. You can use chat, meetings, file sharing, and other features within Microsoft Teams to work together effectively.
Step 9: Customize Your Team’s Appearance and Settings
To make your team feel more personalized, you can further customize its appearance and settings. Here are some additional steps you can take:
- Team Picture:
Upload a team picture or logo to make your team visually identifiable. This can be particularly helpful in a large organization where multiple teams exist.
- Team Notifications:
Adjust your team’s notification settings to ensure that you and your team members are notified about important updates and messages promptly. You can choose to receive notifications for all activity, mentions, or only for direct messages.
- Apps and Integrations:
Explore the Microsoft Teams app store to add third-party apps and integrations that can enhance your team’s functionality. You can integrate tools like Trello, Asana, or Salesforce to streamline workflows and access information more conveniently.
Step 10: Create Tabs and Connect Apps
Microsoft Teams allows you to add tabs to your channels, which can include files, websites, and applications. This feature enables you to centralize essential tools and information within your team channels. To create tabs:
- Navigate to the channel where you want to add a tab.
- Click the “+” icon next to the channel name.
- Select the type of tab you want to add, such as a SharePoint page, Planner, or a custom website.
- Configure the tab settings and provide the necessary information to integrate the app or content into your channel.
Step 11: Manage Team Members and Permissions
As your team evolves, you may need to add or remove members, adjust their roles, or modify permissions. To manage team members and their permissions:
- Click on the team name in the left sidebar to access the team’s main page.
- Select “Manage team” from the “More options” (…) menu.
- Here, you can add or remove members, designate owners, and adjust member permissions.
Step 12: Schedule and Conduct Team Meetings
Microsoft Teams offers powerful video conferencing and meeting scheduling capabilities. To schedule a meeting:
- Click on the “Calendar” tab in the left sidebar.
- Click “New meeting” to create a meeting invitation.
- Add participants, set the date and time, and configure meeting options.
- Send the meeting invite to your team members.
During meetings, you can use features like screen sharing, chat, and file sharing to facilitate discussions and collaboration.
Step 13: Establish Team Guidelines and Etiquette
To ensure smooth collaboration within your team, it’s important to establish guidelines and etiquette for communication and behavior. This might include guidelines for responding to messages promptly, using specific channels for certain types of discussions, or setting expectations for meeting participation. Having clear guidelines can help prevent misunderstandings and promote a respectful and productive team environment.
Step 14: Create and Share Team Documents and Resources
One of the key benefits of Microsoft Teams is its integration with Microsoft 365, which includes tools like OneDrive and SharePoint. You can create, store, and share documents, spreadsheets, and presentations directly within your team channels. Consider creating a central repository for important documents and resources related to your team’s projects. This makes it easy for team members to access and collaborate on files.
Step 15: Monitor Team Activity and Performance
As your team begins working together, it’s essential to monitor activity and assess performance regularly. Microsoft Teams provides analytics and reporting features that allow you to track things like channel activity, message engagement, and meeting statistics. By analyzing this data, you can identify areas for improvement and make informed decisions to enhance your team’s efficiency.
Step 16: Regularly Review and Update Team Settings
Teams are dynamic, and as your projects evolve, your team’s needs may change. It’s crucial to periodically review and update your team settings, including membership, privacy, and permissions. Removing inactive members, adjusting privacy settings, and fine-tuning permissions can help keep your team environment organized and secure.
Step 17: Encourage Team Engagement and Collaboration
A successful team not only relies on technology but also on active engagement and collaboration among its members. Encourage team members to share updates, ask questions, and contribute to discussions. Use features like @mentions to notify specific members when their input is needed, and regularly check in on team progress to ensure everyone is aligned with goals.
Step 18: Provide Training and Support
Not everyone on your team may be familiar with all the features and capabilities of Microsoft Teams. Offer training sessions or resources to help team members become proficient in using the platform effectively. Additionally, provide a point of contact for technical support or questions related to Microsoft Teams to ensure that any issues are resolved promptly.
Conclusion
Creating and managing a team in Microsoft Teams involves not only the technical setup but also the establishment of best practices and a culture of collaboration. By following these additional steps and continually fostering a collaborative environment, you can maximize the potential of Microsoft Teams to enhance productivity, streamline communication, and drive success within your team or organization. Regularly revisiting and refining your team’s processes and settings will help ensure that your Microsoft Teams environment remains a valuable tool for your team’s growth and achievement.